|
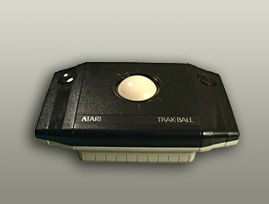
The Cheep Hackball was originally built from an Atari 2600 Trak-Ball which had been gutted, and the innards replaced with those of a Kensington 3-button USB Valu-Mouse (the same one used for the Cheep Spinner). Trak-Balls similar to this sell for a measily $9.95 on the web. The hack is also completely reversible, with no damage to the Trak-Ball at all (although the mouse is pretty much history). However, since Atari Trak-Balls are in pretty limited supply, are a bit flimsy, and don't mount easily in a control panel, I'm now building these from Happ parts and miscellaneous bits of hardware instead. This will drive the cost up, unfortunately, since the bearings alone run $20 for a full set. However, labor-wise, this is much easier to build than a Cheep Spinner. I'll still post up a "how-to" for those that want to make the Atari hack themselves though. It's really easy. The ball itself is not a "real" track ball. It's a standard 2 1/4" cue-ball. These are the same size and weight as a trackball, and I can get them from Happ for about $3.50 (or $3 for a super-cool looking 8-ball). (Actually, I believe they just use cue balls anyway, and just charge more for them.) By the way - the reason I'm going for a mouse-hack, is so I don't have to pay the extra money for all of the Happ USB interface stuff. It's a lot cheaper, and takes up less space inside the box too.
Update 12/18/01 - The final Happ version of the prototype is all done. I used a larger case, and ended up cutting down the height so everything fit snugly inside (otherwise it was top-heavy). It works great! It feels smoother than the Atari 2600 version (probably because the Atari version doesn't have as much support under the bearings), and I beat my high score on Crystal Castles on the second game I played. I'll post more details when I have the chance, and I'll also post a complete "how-to" guide at some point. This is easier overall than the Spinner to build, but there's more soldering to do. The Hackball is Control Freak-Compatible. Meaning it has an on/off switch on it, so it can be turned off when using the Spinner so bumping it accidentally won't do anything. It also has a 1/8" jack on the back in case I need to be able to plug in a panel-mounted button (or two) to use it as a mouse. There's no way to fit arcade buttons in the Hackball case, and even if they could, they'd be too close to the trackball to be usable. I'm still planning to make a "how-to" for hacking an Atari 2600 trackball, too. Ironically, the Happ parts are actually licensed from Atari to begin with - so this is an Atari trackball either way. But the Happ parts are definitely more durable and better constructed.
Update 11/14/01 - The Happ parts are here, and as I was afraid of - they won't fit in the Cheep Spinner case. I could probably cut enough off of the Happ base to fit width and length-wise (which I'd originally planned to do), but it's almost 1/4" too tall, and that can't be cut at all. What this means is, I have to move up to the next larger case size, although it's a lot taller than I want it to be, so I'll probably end up cutting that down anyway. It's kind of a pain, since there's all this extra plastic on the inside that has to be filed off for the the lid to fit. This also means the case will be an inch wider and longer than I wanted it, so that means a bigger chunk of real estate taken up on the Control Freak. However, the bigger case means I don't have to cut down the Happ base, so that saves some work. The big plus though, is that using Happ stuff is going to make it far easier to build the Hackball than I ever could have done it from scratch, even despite the extra work on the larger case. A couple other notes: I'll probably be building another Atari Hackball (for a customer), and when I do I'll be sure to document it so others can make the hack if they want. I may also try the same thing with a Nyko Playstation trackball, since you can find them for as little as $5.99. Of course, they may be total junk for all I know.
Update 11/3/01 - I've ordered the Happ trackball housing. Hopefully it will arrive this week sometime. I'm wondering if I can get it to fit into the same case as the Cheep Spinner. I hope so, since this is important for the Control Freak to be built the way I want it. I'm going to search around and try to find a recessed switch for the on/off switch. This will allow me to mount it on the top of the unit, without it accidentally getting hit. This also is key to incorporating the Hackball into the Control Freak.
Update 11/1/01 - Well, I bought most of the Happ parts I need for the non-Atari prototype. But it became very clear very quickly that constructing the main part of the chassis (where the bearings are held) out of scratch is going to be much more work than it's worth. The problem is a combination of holding the bearings in the exact position they need to be, coupled with mounting the assembly in such a way that it lines up at the correct height and position relative to the hole the ball sticks through. So, while those problems would eventually be solvable, it would cost me much more in time and money (tools, materials) to do the same thing only $13 worth of Happ parts will do. So, I'm placing an order for their trackball housing. This means the Hackball will be more Happ than not, but the cost will still be a lot less in the end than buying a complete trackball setup from them anyway. The plus side with using the Happ housing is that it will make this thing much, much easier to build than the Cheep Spinner is, which means less labor costs. Additionally, there will be an on/off switch on the Hackball, which is being added for better integration with the Cheep Control Freak. It's not so much a "true" on/off switch, as it is a signal-interrupt switch, which will make the mouse think it's not moving. The idea being, if you're playing a game using the Spinner, you don't want to accidentally hit the Hackball and have the cursor go wacky on you. I'll post new photos here when I have something put together.
Update 7/3/01 - Put up this quickly slapped-together page on the prototype.
Update 6/26/01 - Well, I've got a prototype working now (after only a couple hours' work) - and it works great! Far better than an off-the-shelf Kensington. Hey, no offense to Kensington, I love their stuff. But their trackballs are meant for mousing around, not slamming your palms into at really high speeds. Trackballs built to use with computers tend to be over-sensitive. This is due mostly their encoder wheels (which tend to have far more and much closer-together spokes) and the smaller diameter of the rollers that the trackball rides against. The Atari (and Happ) trackballs have encoder wheels that require the ball to be rolled significantly farther than the computer ones do, to generate the same amount of movement. This results in a sensitivity much more in keeping with arcade trackballs (in fact, they're the same parts as arcade trackballs). This also helps cut back on the problem where spinning the ball at high speeds causes the cursor to go backwards. After I finished the prototype (isn't that always the way?) I found a much better way to re-solder the mouse parts to the new circuit boards, that doesn't involve the really unpleasant bending of the leads, that I did for the Cheep Spinner. This will help speed up all such projects. More on that when I get the next one built. Once I build a working Hackball from scratch (and Happ parts) then I'll start diving head-first into the Control Freak. I wouldn't anticipate seeing anything on that until mid-August though, due to a much-needed vacation the R&D department will be taking.
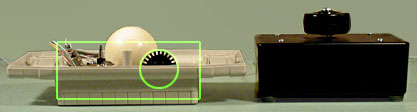
The Hackball (with top removed) side-by-side with the Cheep Spinner. The green outlines show the dimensions of the box used for the Spinner, and the size of the encoder wheel. This means I can use the same Radio Shack box for the HackBall. That has a two big advantages - it makes the Hackball a stand-alone Trackball, but also allows it to be control-panel mounted.
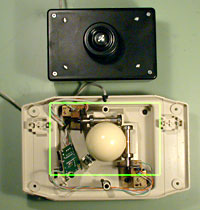
Top view. The outline shows the size of the Spinner's box. All of the critical components fit neatly within it.
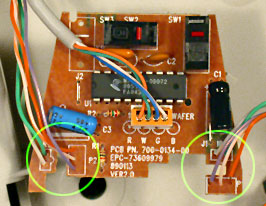
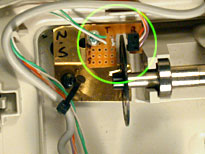
Close-up of the circuit board. The North-South transmitter and reciever were in the left circle. The East-West pair were in the right. I didn't get the mouse buttons hooked up, however. I was too impatient to start playing some games. The wires lead to the new circuit boards...
The North-South pair. I made a custom bracket from some bent brass, and mounted the everything in the same orientation as it was on the mouse, just to make it easier.
The East-West pair. Same process here. In both cases, I didn't have to do anything to the case to mount either board. The screw and hole that hold the bracket in place were there from the Atari guts. |